Friday 4 August 2017

Trip to Stockholm

We have been wanting to go for a cruise with kids for some time by now but we have thought that theyare too small to actually enjoy it. However, my husband was rewarded as an employee of a month with a cruise gift card! We decided that we would go with the whole family and it actually turned out to be a good idea. The kids were thrilled and enjoyed (almost) every bit of it. We chose Silja Symphony by Tallink Silja Line simply because it is the best cruise ship there is. ;) Seriously, it is big, spacey and it has wide promenade in the middle. The restaurants are good and the whole ferry was remodeled just couple years ago, including the kids' play room. Silja Symphony cruises between Helsinki and Stockholm and it stays in the port of Stockholm for a day so you have time to go exploring Stockholm. Also, you get to spend two evenings on the ferry, just nice mini break.

Going for a cruise with kids is one thing - driving over 200km to get to the port is another thing. Our kids are quite used to travel in a car though so the driving part wasn't that bad actually. Activity books, especially erasable books are good in a car trip. Our younger kid is a bit of a perfectionist and solving some mazes with usual pencil in a car isn't a good idea, at least if haven't taken ear plugs with you. Apparently the pencil isn't good enough even it can be erased as it leaves some imprint on the paper, not good. Dry erase pens are great, they can wiped off completely so they work well in a moving car. Then we had audio books for the kids and just in case, a tablet. Usually that's needed only in the end of the car trip - if even then.

Nowadays we usually use our phones to take picture as the phones have so good cameras that the pics turn out much better with them than with our (old) digital camera. So this time we gave the actual camera to the kids. When we arrived to Helsinki they started taking pics.

Quite good shot from a moving car by 5 year old, don't you think?


For those not familiar with Helsinki, the statue is one of our former presidents, Mannerheim and and behind him an art museum, Kiasma.

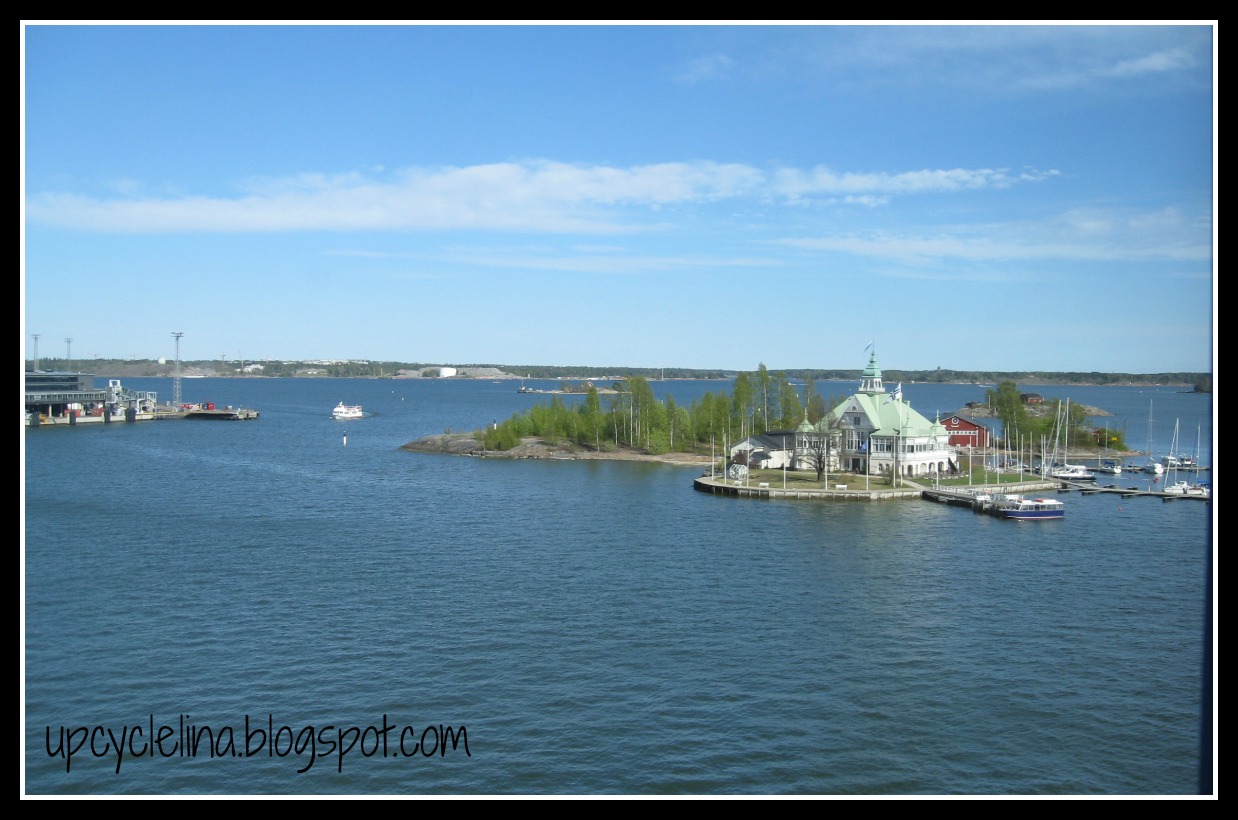
There are many others from Helsinki; trams, busses, houses etc. It was first time in Helsinki for the kids and biggest city they had visited by then so it was all very exciting. Then there are of course many shots from the ferry itself, this one is taken on board, islands right next to the port of Helsinki:


Then there are several shots of small things, things you don't pay attention to. Like this one:


Their activity book on a window shelf while having breakfast on the ferry. I made these erasable activity books last summer. Then I used "wet-erasable" pens but for this summer I bought these dry-erasable ones. More about the books here.


Time to start our trip! Our ferry, Silja Symphony (Tallink Silja Line) at the port of Helsinki. More about the ferry here.


The kids on the window shelf of our cabin. We chose a promenade cabin; 4 person cabin with two bunk beds and a window facing the promenade. The window is big and gives you a feeling of bigger space in otherwise small cabin. The other option with a window is of course the seaside cabin but the window is rather small and after leaving the port there is nothing much to watch. Always interesting to watch the people walking on the promenade. The kids liked it too.


Helsinki


Watching the ship departuring.


Tiny islands on the archipelago of Helsinki, these were completely covered by birds.


Arriving to Stockholm. The ferry goes in middle of islands for couple hours at least, the archipelago of Stockholm continues quite far on the sea. There are beautiful houses and summer cabins on almost every island, some are reachable by ferry boats, some only by the house/cabin owners' own boats. It's always great to eat your breakfast and watch the islands go by, getting bigger and bigger while getting closer to the mainland.


There is big buffet restaurant serving dinner and breakfast. The breakfast offers pretty much anything you can imagine; bacons, eggs, porridge, bread, cereals etc. My favourite is usually natural yoghurt with yam, seeds and nuts on top. Something I don't usually have at home.


We weren't planning a visit in a toy store but we happened to get out from an underground almost in front of the biggest BR toys in the Nordic. When the kids spotted it, we didn't have much choice. :D They wanted to have their picture taken with full-sized Lego Friends made out of Lego bricks.


Our main plan in Stockholm was to visit Junibacken, an indoor activity park based on the stories by Astrid Lindgren and other swedish children authors. First thing I spotted outside was this tree with huge real-looking bananas.

Junibacken is like nothing else, it has activities based on the children's books, the look is very different compared to those new plastic, flashy activity parks you usually find. Here the atmosphere is calm, no one seems to be in a hurry. First thing you see in Junibacken is Storybook Square. Storybook Square has places to climb, slide, explore and play for a long time. It is made so well that even the adults aren't bored, there is so much to see and so many details that you just won't believe it before you see it!


Princes's place; dragon watching over a treasure and dresses hanged out to dry.


Pettson's workshop from the books called "Pettson and Findus" by Sven Nordqvist. Everything here is kids size so they can reach almost anything. There are no warning signs anywhere forbidding you to touch the exhibition, the kids are encouraged to touch and play.


Alfons Åberg (Alfie Atkins, by Gunilla Bergström) watching over everything.


There was plenty of upcycled (probably more than I could spot) and re-used old items.


After the Storybook Square we took the Story Train that travelled through the scenes of the stories by Astrid Lindgren. The train had full Finnish narrative so the kids were able to follow it too. The Story Train arrived to Pippi Longstocking's house. It is every bit as wonky as you would imagine. Like everything else, the house was completely free to explore, there were also stairs up and slide down (on the tower on the left).


Laundry hanged to dry.


The house was full of old things.

Junibacken's idea is to take you inside the stories and I have to say that it's exactly what it does!


On our return journey we skipped the buffet table and ate in one of the à la carte - restaurants. The dish here is "Captain's sword" and the meat really arrived in a sword. Beef, chicken and lamb with delicious pepper sauce, oven vegetables, salad and french fries.

The journey back included more time in kids' land with ball pool, circus show and finishing the Lego sets the kids had bought day before. How can you leave something like that to do at home when you can do it right away, no matter how tired you are?


In Stockholm after visiting Junibacken our son asked if we could go home already because there were too many people. Indeed, I could feel it too. Not that I would mind that much but it was the first time I have been in a big(gish) city with two kids. They have grown up on country side, in a place where you can run at the end of the road and still see your parents. Where they can go to playground themselves or ask their friends out. Where you don't have to mind other walkers or bikers on pavement... I was constantly looking around as my kids weren't and pulling them back before they were run over by bikers! I have tried to teach them to look back before crossing the pavement, but no, they don't remember it, maybe because there is usually no one there? The cars weren't a problem, that's something they have learned to be careful with. To parents in big cities; I have no idea how you manage, I was stressed enough only after half a day!

So, when we stopped by a lake close to our home to stretch our legs and the kids saw the lake with sand beach, they grabbed their Littlest Pet Shop-figures and had immediately a play going on. Almost home!

All in all, great mini vacation, not nearly as catastrophic as I would have thought!


Monday 15 May 2017

Diy Lowly Worm plushie


Our kids have quite often different opinions about kids' tv programs; what is boring, what is scary, what is just plain stupid etc. However, there are few programs that they both agree on, one is Richard Scarry's Busy Town (at least for now). It isn't flashy and polished like the new computer made animations, the atmosphere is calm and friendly and even I knew the characters as a kid! It's always nice when they like something just because it is fun, not because it is something that everyone likes right now (and forgets when new characters are introduced by the toy factories).

We have Best Make-It book Ever! by Richard Scarry. It includes all kinds of crafts; you can cut out the characters and buildings from Busy town, both instructions and ready cut outs to make finger dolls, calendar, cards... It is thick book with plenty to do. I bought it last summer to have something to do at the summer cottage if it rains and it has turned out to be great fun. There is still plenty to do.

I was browsing through it with our son one day and we read a story from that book about Lowly Worm and it ended with words "now go and make your own Lowly Worm!". The book had patterns and instructions to make your own plushie. The book told to ask help from someone who can sew and find the fabrics from your mum's fabric scrap box. Since there is no shortage in either, we started the project.

Lowly Worm is pretty easy to do and I won't publish here full instructions nor the patterns as I think they are copyright protected. Anyway, it isn't hard to figure out just by looking at the pictures.

The worm itself is made out of two parts; the one with the brown fabric making head and body and the green making the pants. The hat, coat and shoe are separate parts.


The book advised to use felt, understandable as it's very easy to use but I used what was in the scrap fabric box and took fabric out of couple old t-shirts. The original advice was to cut the eyes out of white and black felt and glue them on but I didn't want to use glue. I had a feeling that the plushie would end up being carried everywhere and played with a lot so the glued eyes would come off eventually. I used buttons instead and our son chose the red ones. I would have used black ones as it looks a bit demonic now but he is happy with it. The hat has yellow ribbon sewn on it and it is attached with few hand stitches. I attached the hat and the eyes as well as embroidered the mouth once the plushie was otherwise ready.


The coat is made out of a sleeve of a t-shirt and of course I took use of the finished edge! The top edge I sew with zig zag. The bow is just a piece of red fabric with raw edges and attached with couple hand stitches.


The original instructions didn't mention about filling the shoe at all but I thought it is nicer this way. I filled the shoe with the smallest fabric scraps so it is a bit harder than with other padding. I used the ready finished edge here too.

Making Lowly Worm didn't take much time, was very easy and our son is very happy with it. What could be better? Oh, and it used at least some of my fabric scraps, always good too!

Monday 1 May 2017

Happy 1st of May!

This blog had a birthday in April - which I completely forgot! I'm terrible at remembering the days anyway; birthdays, anniversaries... I don't remember the date and I usually don't even remember the year. I guess that they aren't that important to me, more important is the thing itself. For example as much as I like our cats and dog, I simply don't remember their birthdays! I remember my own (just!), husband's and the kids, that's enough right?

So I will just wish you all Happy 1st of May!


The weather has been rather insane! It has snowed, then it has looked a bit like spring, then it has snowed again and as soon as the snow has melted, it has snowed again. This picture is from yesterday (the sticker the bottom right corner is covering my kids' names made with window paint) and as you can see, it snowed! There is more snow than there was on Christmas. And today? Sunshine, +10 celsius and again a hint of spring. Sounds promising! But they say about the Finland that at least during the summer it doesn't snow that much...

The reason this blog has been this quiet is that I have sewing quite a lot but with new fabrics, no good upcycling ideas to share with you, sorry. The kids needed new clothes, their doll needed new clothes, there were some presents I wanted to do etc. I have shared some of them in Instagram/Facebook but thought I would show them here. I haven't photoed them all though, for example I made new leggings, shirts and outdoor pants for my daughter but didn't remember to photo them and now at least one pair has broken knees...

I also started working as a part time in a grocery nearby. About 3 days a week, so not that much but it certainly cuts down the sewing time.


These were made actually before Christmas but they never made it to the blog. Triangle pouches for the kids to keep the new legos from Lego advent calendars.


This is actually upcycling, or just use whatever you happen find when the need is bad. Our daughter had ice skating at the preschool and I realised the night before that the skates probably should have some protection! A class of 6 year olds carrying rather sharp ice skates doesn't sound like very safe. These were quick to make and being jeans, they also lasted through the ice skating times nicely.


We had our kids' cousin's birthday and she wished for baby worry eater. I made smaller worry eater (she already has the big one) and thought I would sew something else as well. Tulle, ribbons and satin and there you have it; princess's hand bag that probably is good enough for any little girl! Everything used is from my storage.


We also attended a wedding and I really saw an effort to make a shirt for our son that he would actually like to wear. I mean, the girls at this age are easy; any princess dress works and they actually want to wear them. But boys? No such luck. And it's fine as long as you have a son who doesn't care what they wear but we don't. I know I could have said that he has to wear the neat clothes I have chosen because it is a wedding and he probably would have done so but he wouldn't have enjoyed it at all. I thought I would at least try to make something for him that would give him as nice feeling as that princess dress for his big sister. Finally we ended up with a knit fabric shirt, bright green shirt with a pocket that has Minion on it. I don't think the characters belong to a shirt that is going to be used in a wedding but he is 5 years old and if that's how I can make him want to wear something, then that be it.

And what happened? The lingonberry juice happened, the photo is taken after two times washing it. After this I took it outside sunbathing (we actually had few days of sun in a row) and it looks quite good now. You can spot the stains if you look really close but I think the shirt can be used again. What a relief! The other option would have been to applique more Minions to it.


Upcycled through and through! A bed for cat, crocheted with yarn cut out of old clothes. Tutorial for this coming later.


When the sun started shining a bit warmer, our kids took their dolls outside. At least our daughter did, son took his teddy bear and dressed it with doll clothes. Then I realised that he needs his own doll too! Then I saw on our local Facebook group someone selling similar doll than the one our daughter has and bought it for him. And how happy he was! Shame he hasn't had a doll before. The stereotypes sit tight in us. The girls can get toy cars as birthday presents but how many boys have got dolls...?

We have toy cars, small and big, we have Littlest Pet Shop-figures, Barbies, Fireman Sam-figure, Octonauts etc. Some are our daughter's, some our son's and it's great to see them play with all of them together. No boys' or girls' play, just playing. The same with Legos, if they get to choose their own Lego packages from a shop they check them all based on their interests, not what belongs to girls and what to boys. And if you ask me, that's how it should be.

Oops. I missed the point. I made new clothes for the doll. Of course it needs outdoor clothes if it is going to play outside, right?


At least there can be found greenery inside even there is lack of it outside! My husband has been working for Naava for few years now. The company has developed an active green wall that cleans the air very effectively. A product that has huge demand nowadays, it is pretty much the only thing that can remove huge amounts of harmful chemicals out of the indoor air. And it's just not something sold in Finland, they are currently starting the manufacture and selling of these walls in United States! If you want to know more, they have very thorough explanation of how it works on their website: https://www.naava.io/en/

The plants are tested and there aren't any poisonous ones so you can pretty safely let your kid bury their face into it! He said he wanted to camouflage as he is wearing a green jacket...

Tuesday 7 March 2017

Car seat bag tutorial


Finally! I made this bag as a present back in August and now I'm finally posting it. Why? Because it is full tutorial and writing it is bigger job than making it was! But here it is, full tutorial how to make car seat bag for a baby. And not just any bag, this one is adjustable to almost any baby seat, it doesn't matter if the car seat has three point or five point belts. It is great during winter or cold weather overall, no need to wear thick clothes for the baby when you can wrap him/her in a warm sleeping bag. Plus, it is even safer for the babies as you can fasten the seat belt more securely when there are less clothes on the way!

Let's start with what you need:

Fabric for the cover
Insulation fabric e.g. fleece, wool or other padding
Lining, something soft and comfortable e.g. velour, any knit fabrics

Fleece is affordable and rather warm but one warning; having too many layers of it means that the bag doesn't breath at all and that's definitely not good for the baby! Fleece is purely plastic. I used new fabrics for all of the layers as it was a present but you can easily make car seat bag with recycled materials too. Just take padding out of old duvet, use old felts etc for the lining and for the cover almost anything goes, old curtains are always great!

For each layer you need fabric 90cm x 92cm (width x height, inludes seam allowance)

Zip 60-65cm
Metallic snaps
Small pieces of fusible lining

Figuring out how to make a sleeping bag is rather easy but figuring out how to make it suitable for any car seat, wasn't. I didn't have any idea if the family who I was giving it to, had three point or five point car seat for the baby and obviously I couldn't ask so I had to go the harder way. 

For car seat with three point belt you can make pretty simple bag; just make button holes for the places that the belt goes through and that's it. You can still easily remove the bag with baby on it without waking him/her up.

I could have made button holes for the five point seat belts too but then you would need to remove all the seat belts from the car seat before you can use the bag or remove it. Not very easy and it would easily become unused.

The other problem was the measurements! I found tutorials for bags like these but no one mentioned where the belts should go, only the rough measurement of the whole bag. And I had just managed to get rid of our baby car seat. Luckily, I belong to couple great Facebook sewing groups so I asked there for few different seat measurements. It's amazing how you get an answer there in minutes, no matter when you ask it! And here they are, the measurements I used.


Measurements are cm. This is also your pattern, the top is where the baby head comes to and the sides come together with a zip. Down in the middle you see number 22, that's the height from the bottom for the first button hole for the seat belt that goes between the baby's legs. On top you see small number 3, that's the distance between the line marked in the picture (top of the zip) and the bigger button hole. Makes no sense? Check couple more photos and it starts making sense (hopefully).


Here is the drawing of the giant button hole for the bag! Yes, the bag has one "small" button hole (the one on the bottom) and two large ones. The button hole on the bottom is 8cm wide, should be enough for almost any baby car seat. If it's not, just make it wide enough. Then measure 5cm to the left and right and 5cm up (drawn with black colour) and mark your big button holes. The button hole is 38cm long and after the turn point on the top, 5cm wide. So two large L-holes. The blue markings are for the snaps, I used three on both sides, distances as shown in the picture. 

For now, just mark these on the reverse side of the fabric. I recommend using something more permanent than chalk as you need these later on, just make sure you aren't using anything that shines through or spreads in the washing machine.


I used pencil as you can (hopefully) see here.


Make a tab for the zip for easier sewing and also great if you don't have a zip with desired length.


Then prepare the snap "flaps". I really like this fabric but it is horrible to take a picture out of it if you are trying to show something! Follow the green arrows and you should see what I mean. The flaps are used to close the L-button holes so both ends are on different sides of the button hole. I thought it is better that the end with the snap is on the outer side to make the bag more comfortable for the baby.

edit. I added a drawing about the snap flaps as the photo wasn't very clear. (The drawing is a bit wonky but hope you get the idea...)


Cut 6 pieces of fabric, approximately 5cm x 8cm (width x height). Cut out a bit smaller pieces out of fusible lining (you don't need it in seam allowances), iron them on.


Iron also small pieces of fusible lining on the cover fabric, on the places where the snap goes and also to where the flap is going to be attached.


Sew the flaps. I tried to make them tube first but way too narrow to turn them right way! Much easier to sew the other end with right sides facing, turn and fold lengthwise, fold and iron the two longer edges, stitch over.


Tools I had for fastening the snaps; pliers by Prym and usual pliers from tool box to tight them a bit. Prym pliers are great for fastening the snaps but if you don't secure the snaps with the other pliers, they tend to come of. 

I usually press the snap on every side like this after using the Prym pliers:


If you are working with delicate fabrics, it would be good idea to use a small piece of fabric between the pliers to prevent them from harming the main fabric.


Sew the snap flaps on their place. I sew them with small zig zag and added extra piece of fabric on back side. Attach the other half of the snaps on the other side of the button hole soon-to-be. Use extra layer of fabric here too, else the snap will just come through the fabric.


In the next steps you want to see where the button hole comes, so sew around your markings, just with long straigh stitch. Remember to sew exactly where the button holes are going to be, you won't have any other markings visible later on.


I made the top of the bag from different fabric, now is the time to sew the bottom and the top together. Iron that seam with seam allowances open (1.). Sew the top seam and iron again seam allowances open (2.).

Sew also the top seam of the linings. If the fabrics you are using are very thick, you can sew them separately, I sew my linings together, easier to handle. Place the lining against the main fabric right sides facing.  I have to say the clips work here perfectly! The pins always makes the thick parts a bit wonky. Sew around the hood, from one corner to another. Leave the long sides open.


Turn, iron and stitch over.


For the next step make sure that the layers stay put. I used clips but if you don't have them, baste stitch around the open edges.


Sew around the button hole marking stitch using regular straight stitch. This is to prevent the fabrics stretching when making the button hole and it goes through every layer so it also keeps them still.


Sew the button hole following the markings made before, mind the snap flaps.


Remove the baste and support stitches when visible.


Sew the zip onto the lining, fold and iron the seam allowance of the top fabric.


Pin/clip and sew.


Sew the bottom. I chose to sew it so that zip is on the other side but you can also place it in the middle, depending what kind of form you want for the bottom of the bag.


Almost ready!


Cut open the button hale. Be very careful! You don't want to ruin your hard work now.


This is how the belts come through the bag. Thanks to the big button holes and snap flaps you can pretty easily place and remove it from the car seat or pram, even with the sleeping baby (at least if he/she is heavy sleeper and don't mind you moving him/her around!). Just remember that there are only snaps on the back, they won't support the baby's weight even for a second so always support the baby like usually.

I have to say that if making the bag was a real piece of work with figuring out the sewing order, so was writing this blog post! It has been few months when I sew the bag so trying to remember every step was quite hard. This tutorial is by far the most complex in this blog but I'm glad I managed to write it all down!

I hope you enjoy it and find some use for it. Of course if I missed something or there's something unclear, just ask.