Saturday, 28 May 2016

Upcycled bag from old shirt


I have one handbag which shoulder strap is attached with safety pin and one that I recently bought from second hand store which shoulder straps are completely loose and not a chance I could fix them with safety pin. Should have known, it only cost 1€ and looked descent. Closer look tells me that the shoulder straps have been fixed with couple hand stitches by someone. Luckily didn't cost more and it has lots of material for new bags! This bag broke when I was walking with our dog from grocery store back home. I had thought that maybe a nice walk would help the stuck shoulders and neck. A combination of dog who simply can't stand other dogs while in leash and a handbag that I can't carry on my shoulder but instead had to grab it under my arm means that my shoulder and neck weren't definitely better when I got home!

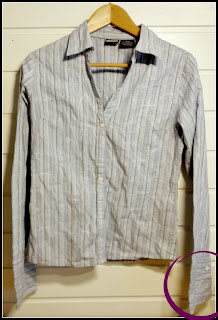
Time to do something for it. I have a shirt that I like for the fabric and have kept it for that reason even though it doesn't quite fit to me now. I decided it was nice for a small hand bag for the summer as the colour is light blue. I wanted a handbag which size would be something like my old favourite bag, i.e. big enough to hold wallet, mobile phone and water bottle but not any bigger than that and this shirt was just nice size for that.


Front part of the shirt became front part of the bag and the back part the same way, shoulder strap was made out of the sleeves, the buttons were used and I also used one of the cuffs for inner pocket. This shirt has rather long cuffs, just good for a pocket.

Of course I had to take the shirt apart and I could just cut the seams, no need to rip anything. But of course shirt like this has darts and those can't be left unnoticed. The ones in front weren't on my way but the ones on back were so those had to be ripped open.

This upcycled bag follows pretty much the tutorial from http://www.handmadiya.com. I skipped the pocket part of the tutorial as I made the pocket with upcycled cuff. If you want to do it like I did, just sew your cuff on the lining. Cut the cuff in two, lower part being slightly bigger (you would want the button to be in this part), stitch the pocket part onto the lining. If you have thin lining I recommend using fusible interfacing behind the pocket (if you haven't attached the interfacing for the whole lining). Sew the cover of the pocket (the one with the whole) on to the lining right sides facing, turn the cover and stitch over it. This way you can make a pocket for important things like passport with very little effort.


The next step for me was to make a pocket outside the package using the buttons in front. After cutting the main fabric with buttons closed I cut the pattern in half following the lower edge of the button row, cut suitable part from lining and sew them together. Tip; use zipper pressing foot if you do this, not working with usual one!


After this it was just following the tutorial as linked above. The tutorial didn't include pattern but this one is easy enough to draw, just check that the length of the zip panel is exactly the same as the upper edge of the bag.

I used fusible interfacing for the main fabric and behind the inner pocket and of course that can't be upcycled. The fabric of the shirt is quite soft and thin and even with the interfacing it still doesn't look as neat as I would like it. However, with harder and thicker fabric it wouldn't even need interfacing to look nice.


The pictures taken inside are nothing compared to pictures taken outside, I think I will use the light outside as often as the weather allows it.

As always, feel free to pin my pictures in Pinterest - or follow me there! You can now follow me in Facebook too so remember to check that too!

Thursday, 26 May 2016

How to patch knees

Before ucpcyling something, it is best to try to fix it first. The time for upcycling is when they are beyond repairing or fixing. If you have kids, this looks familiar:


 I know that many pants end up to the trash bin when this happens (I have done it myself) but what a waste of money and fabric! I know it isn't fun and of course you need to have sewing machine and time. Which I know that many people lack. But even then you can buy iron-on patches, those won't take time that much. So if the pants are worth saving (i.e. there is nothing else broken or stubborn stains), at least get a package of those and you have saved quite a bit of money and nature. Patching isn't my favourite thing and I usually keep postponing things like this. There just isn't the same feeling as in creating new but there were four pairs of these and all of them of course my daughter's favourite leggings. The choice of what to wear had become quite limited for her so it was time to do something for it.

Of course there are several ways to patch the knees but here is how I do it. First I ripped the seams because I sew the patches on with sewing machine. Notice that the pants have over stitches on inner seams so naturally I ripped the outer seams. How you rip the seams is up to you, depending what way you prefer and of  course what kind of fabric and seam you have. These pants had over-lock seams and the needle threat was nicely loose so I cut only the both needle threats between couple centimeters and pulled them away, the rest became loose after that. If you have tighter seam and harder fabric you can always use the tip I mentioned in Bedside pocket for loft or bunk bed.

I ripped just enough to get working space for the patching, in this case something like 20-30cm and I left the bottom of pant leg untouched to avoid the extra work of ripping that too and then sewing it again. Even you left it untouched, you still get enough space to sew.


For these pants I wanted to add nice patches out of scrap fabrics and I didn't fix the hole in anyway, I just covered them as they were rather small. I started by choosing the fabrics I was going to use, measured how big the patches should be, draw the form on the fabric and cut roughly around. Then I ironed them to bondaweb (double sided adhesive) wrong side facing the bondaweb's glue-side. Protect your iron by covering the fabric and bondaweb (fabric and glueside up) by covering it with baking (parchment) paper. You can also draw on bondaweb as one side of it is paper, but I wanted to know the scraps were big enough and that the images in fabric would be in correct places. With bigger piece (or one without images) of fabric you can draw on bondaweb, cut that roughly and iron it on the fabric, then cut it.

So after ironing it looked like this:


The markings on the fabric show nicely through the paper. Now I cut the patches out following exactly the lines I had marked. It is much easier to cut the patches now after ironing and before taking of the paper as they are more solid now, no wrinkling or rolling. Also if you cut them after removing the paper you are in trouble because they are sticky and it is difficult to get the edges neat as glue is quite hard to cut... I have tried it so just warning you. After cutting, peel of the paper like this:


Then iron again, this time the patches on the pants. Now it looks like you have patched the pants and can just close the ripped seam but don't! The bondaweb won't hold the patches on in use, especially not in a place like this. So after ironing, sew around the patches. Now you can close the ripped seam and you are done!


There, four leggings ready to be used, looking even better than they did before!

Monday, 23 May 2016

Blog Handmade Link up

Upcyclelina on Blog Handmade Link Up here: Blog Handmade Link up.


Blog Handmade is a weekly link up by indiecrafts.craftgossip.com where handmade bloggers can link up their handmade blogs.

So, go and check it, add your own link if you feel like it and visit two posts before you. I find it great place to find new blogs to follow.

What is upcycling?


I talk a lot about upcycling in this blog but as it is new term for me, it is fair to think that it might be new term for my readers too. I discovered upcycling first when I was searching Pinterest for ideas about re-using household items, furnitures, clothes and so on. I looked for recycling, re-making and re-using and at some point came across with upcycling, typed that as a keyword and discovered whole new world.

Because upcycling was new discovery for me, I thought it was new term overall but apparently it isn't. At least not as new as I thought, as I thought it is from this decade, or at least this century. But apparently upcycling was first used already 1994. I was in primary school at that time and re-using fabric to make clothes wasn't exactly what I was interested in. At that time the clothes were passed from one family to other between friends and relatives, at least in our little village. In 1994 I wasn't particularly interested in sewing either.

So I was completely unaware of such a term existing but it doesn't mean that upcycling as an action wouldn't have existed. My grandma used to cut old clothes to be used for weaving rugs. Who would have known that by doing so she was in nowadays terms an upcycler? For her it was a way of life, something that came from her background. When she was younger, everything had to be used, re-used and upcycled to something else as there wasn't that much new materials to buy.

I started dressmaker studies couple years after graduating from high school, in beginning of 2000. We used to make test versions for our clothes out of plain cotton fabric. There was huge roll of it in the school and for the students the price was few euros/meter. Brand new fabric just for testing our self-made patterns? Not once did I think that I could have bought some bed sheets from second hand stores and used those. It would have been great for student budget. Of course it never occurred to me that I could have bought fabric for the clothes we made as well, at least to some of them, from second hand store too. It was so general way of doing things that I never questioned it. Looking back it seems downright stupid thing to do. But re-using old clothes was something my grandma would have done, not something that young student of dressmaking would do.

I had bought clothes, bags and shoes occasionally from second hand stores but it was only when I had my kids that I discovered that world fully. The kids' clothes are so easy to find in second hand stores, especially for babies. Also the clothes are so small that it is easy to take adult clothes and make new kids' clothes out of them. With the kids I re-found my inspiration for sewing too and all of this eventually lead to this blog.

So, what is it then? Wikipedia tells me this:

“Upcycling, also known as creative reuse, is the process of transforming by-products, waste materials, useless and/or unwanted products into new materials or products of better quality or for better environmental value.”

So yes, when my grandma was cutting old worn out t-shirts and wove a rug out of them, it was definitely upcycling. The rugs were the only carpets my grandma's house had, more or less, so they had value for my grandparents. Definitely much more than the worn out shirts would ever have. But when my grandpa cut old t-shirts to use for cleaning and wiping in his workshop, he wasn't upcycling, he was re-using the old shirts.

To clarify the difference between upcycling and recycling one could use terms “downcycling” and “upcycling”. Recycling often is more like downcycling. In recycling for example paper is made paper mass again and used to make new paper but the quality of the new paper is often poorer quality than the original one. In upcycling you break the old item into pieces (at least in most cases) so that it isn't recognized anymore and the end product has more value than the original, unwanted item would have. In my opinion if something is unwanted and un-used, its value is almost nonexistent.

I found a good picture showing the difference from Hipcycle:


When upcycle or recycle then? I'm in two minds about upcycling things that can be recycled, like paper, cardboard, tin cans, plastic bottles and glass bottles. It is of course true that recycling requires energy and/or water to break down materials like stated in Hipcycle (http://hipcycle.com). But if you take a plastic bottle that can be recycled (as for example all soda and water bottles are in Finland) and cut it or glue something onto it, it isn't possible to recycle it anymore and once it becomes unusable it becomes trash without any real way to recycle it anymore. Not so good thing in my opinion. It is nowadays possible to recycle fabric too, but upcycling fabric doesn't necessary exclude the chance to recycle it if need be. 

In fact we just got a new law stating that the textiles aren't allowed on landfills anymore. They have to be recycled the very least and there are of course the eco-centers where you can take your old clothes but also  many clothes shops are accepting any textiles you want to get rid of. At the moment most of this ends up for the use of industry (insulation for example) but there are plans to actually upcycle all the fabrics by breaking them down, make new yarn out of them and then new clothes that might be even better quality than the original fabric. That really is upcycling in larger scale! I'm happy to say that it is the Technical Research Centre of Finland (VTT) who is working with this project. The whole article is here: Textile waste can be made into fabrics that are even better than the original

If you think this is important and/or you have friends who would this interesting, please share this post in Facebook, Twitter, Google+ or Pinterest. You can do it easily by clicking the icons under this post.


Thursday, 19 May 2016

Fabric box and quilt work bag

My daughter has last year in kindergarten and it was time to gift her kindergarten teachers. They have had a recycling theme at the kindergarten so it's more than fitting to make the gifts out of recycled materials. My daughter wanted to bake cookies so I thought I would make fabric boxes for the cookies.


The outer fabric is from a dress that came to us in a package of used clothes and has never been used here. Apparently it isn't pink/violet enough for a little girl, even though I think it is pretty. I have tried to sell it, again, for couple of euros but maybe it wasn't pink enough to be worth of that. :D 


This is what I got out of the dress:


Naturally there is the skirt and the zip but I would like you to look at the white fabric on the left. It is from the hem line and its width is about 10cm, plenty of beautiful fabric for other projects! I kept the upper part as whole as it is my daughters size and I can sew it together with maybe something pink.

The rose fabric is a left over piece that I have had in my storage for 15 years, time to use it, I think?

First I attached the fusible interfacing to the brown fabric. It would have been good idea to use something stronger, or at least add it to both of them but works ok like this.


I cut the interfacing in parts rather than just one piece and left small gaps between the parts to make it easier to fold.

Then it was time to make and attach the ribbons. Fabric for the ribbon is from old shirt of mine. I would have like to use something from the dress or at least the rose fabric but they were too thick to be used in a small box like this. Simply, attach them to the right side of one fabric (it doesn't really matter which one).


Then just sandwich it (brown and rose fabric that is). Remember to make sure the ribbons don't go under your seam and leave a hole of 5cm for turning the box right way up. Turn it and iron! It looks kind of mess but ironing gives it the look it is supposed to have. Stich around 1-2mm from the edge to give it support and close the hole that was left to turn it. I also sew "a frame" on the bottom along the gaps of the interfacing, again to give it more shape. And you are done!


I have been meaning to give some fabric pieces to the kindergarten to be used for crafting but have been forgetting it whole year. Now I remembered it and I also made a small quilt work bag to put them in. Also the bag was part of the gift.


 I followed partly this instruction to make the bag. I took a selection of old children clothes and cut squares of 10cm x 10cm, sew the main piece together and the side pieces. I also made a lining for the bag to give it support. If you want to make like I did, follow the instructions behind the link for steps 1-4 and the same for lining (leave a gap of about 7cm in one of the seams to be able to turn the bag. Stich the handles on their places and sew the top edges of these two bags together, right sides facing of course. Use the gap to turn it around, close the gap. If you want real smooth finish, hand stich it or like I did, make a little seam over it. It doesn't show that much being inside the bag. Iron and you are ready! Though I stiched the corners to give it more shape but it isn't necessary. 

So the teachers got cookies and the boxes, the kids fabric for crafting and I some more space to my sewing room!

Elina 

Friday, 13 May 2016

Bedside pocket for loft or bunk bed

My kids have loft beds with small tables so the books, water bottles and such aren't a problem but clothes are. Either they are piled up on the other end on the bed - or they are on the floor. I decided to try if bedside pocket helps something. The idea is that the clothes that are still ok to wear the next day would be put in the pocket and the dirty ones (at least in a dream world) would go to the laundry basket. In my dreams this means rather tidy kids room. Yeah right. But you never know, it might work.


I found many beautiful ones with many pockets and I considered that too for a while but then decided that just one big pocket is enough. I made straps with buttons to attach it on the bed and used elastic band for the pocket to keep it in shape. Here is a small how to:

As the theme is, everything is recycled, or at least second hand, except the elastic band. Here is what I started with:


Two old worn out bed sheets and one old crib padding. The sheets are in my opinion almost cheating when it is about upcycling as they are similar to use as new fabric but this project needed quite a lot of fabric and in spite of having many things stored, I didn't have anything else suitable at the moment. The crib padding is my kids' old, I have tried to sell it on second hand stores on a whopping price of 2€ for couple times. It seems that since couple of the ribbons used for attaching it on the crib are loose, it isn't even worth of those 2€. I considere to give it away for charity but then decided to keep it for the fabric. Lucky I did, it helds a nice amount of  foam mat that I could now use to give support for the pockets. Then of course, I needed a seam ripper.

The padding was over 3m long and I thought it might take ages to take it apart but I was in luck. The stitch used was long and quite loose. Also there is a handy way to use in the seams like this. Just put the ripper agains the seam with the small ball under it and push along the seam carefully. Nice and fast. This way you will end up with plenty of bits of thread but you can get rid of those easily with tape roller (or just with tape).


Start with cutting the padding for the size you want and also cut two pieces to cover the padding (add the seam allowance and about 1cm extra if you are using thick padding like I did here). Pin them together with padding in middle and sew around.


I don't use that much pins but here you should. The thick padding makes it hard to keep everything in place without the pins. In this picture you also notice that I have rounded the corners, I did that to make it easier to finish the edges later on. Of course, smart move would have been to attach the straps now as well, talk about planning before hand...

Then prepair the pocket itself. I cut mine a little lower than the background and few centimetres wider to give it nice look and also more space. If you want to attach any decorations, now is the moment to do that.

I decided to decorate these with reverse applique. In reverse applique you sew the pictures on the back side of the fabric so that the right side of the picture is against the wrong side. Like this:


I was rather boring this time and made them circles but the form could be anything. I also sew around each picture twice to highlight the border. The pictures are cut from jersey scrabs that are left from making clothes for kids. I use pretty much every fabric to the last bit, literally. I make clothes by connecting some smaller pieces, even smaller ones I use for appliques and the smallest scrabs go to the basket that will be used as a filling for something and is also almost endless source of material for kids' crafts.

Now take small, sharp scissors and cut the actual fabric covering the pictures:


Cut close to the seam but carefully to avoid cutting the thread. You can live 1-2mm fabric, it will just fray a little bit (until the seam) and I think it gives it a nice look.


Then I decided to make free machine embroidery, just circles and loops around the fabric. Nice and fast I thought. Right. Even the fabric is cotton sheet that isn't elastic, still, this might happen (and I should have known it):


It doesn't look nice and this one here, is the ironed version so it wouldn't get any better than this. So I made myself coffee, took my seam ripper again and started taking the embroidery off. Luckily I had used quite long stitch, but even so, I had sewn twice around to make the embroidery bolder so twice as much work. After few cups of coffee and couple chapters from audio book (I like to listen those while sewing) the job was done and I could continue with the actual work. I then did what I should have done in the beginning, used tear-away stabilizer. I haven't bought any "real" tear-away stabilizer as I use the backgrounds of paper napkins and I happen to have a box full of them because I have bought them for decoupaging. Best of all, this is how to use the backgrounds that are left over from decoupaging and I can save the picture layer for decoupaging. The paper napkins often are made with three layers so just separate the layers:


First layer is the one with the picture and two white layers under it and you just need one layer. So one paper napkin gives you two sheets of tear-away stabilizer and one for decoupaging if you need it. Or of course you can use all three as tear-away stabilizer.

Just put your stabilizer on the back of the fabric and attach few pins to make sure it will stay and sew around (on the right size though, just a picture to show it looks like on the back).


Then you can tear it off.


Much better:


Then finish the pocket, sew elastic band on top edge of the pocket and attach it to its place. Make and attach the straps.


Almost ready! I made this green one first but with the pink one I did it in different order that is faster but also might need a bit more experience. With that one I finished the straps first, prepared the pocket, then pinned everything together and sew just once around it. Much faster.


Also the button holes would have been easier to make before attaching here. Now cut bias binding (45 degrees angle to straight grain) and sew it on place. Try it on its place to determine button places, attach buttons.

Ready!


And the pink one as well so both children have their own with their favourite colours and favourite pictures.


Thanks for reading and welcome to follow me on Pinterest!

Sunday, 1 May 2016

Upcyclelina on Bloglovin

Upcyclelina can be now followed on Bloglovin: Follow my blog with Bloglovin In Bloglovin' you can follow the blogs of your choice, there are plenty blogs about fashion and lifestyle. Just add them to your list and you will get notified when they publish. Also you can save certain posts so you will find them later as well.