I have one handbag which shoulder strap is attached with safety pin and one that I recently bought from second hand store which shoulder straps are completely loose and not a chance I could fix them with safety pin. Should have known, it only cost 1€ and looked descent. Closer look tells me that the shoulder straps have been fixed with couple hand stitches by someone. Luckily didn't cost more and it has lots of material for new bags! This bag broke when I was walking with our dog from grocery store back home. I had thought that maybe a nice walk would help the stuck shoulders and neck. A combination of dog who simply can't stand other dogs while in leash and a handbag that I can't carry on my shoulder but instead had to grab it under my arm means that my shoulder and neck weren't definitely better when I got home!
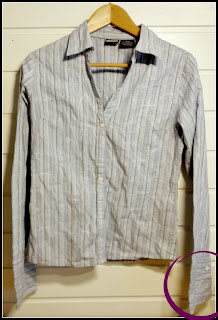
Time to do something for it. I have a shirt that I like for the fabric and have kept it for that reason even though it doesn't quite fit to me now. I decided it was nice for a small hand bag for the summer as the colour is light blue. I wanted a handbag which size would be something like my old favourite bag, i.e. big enough to hold wallet, mobile phone and water bottle but not any bigger than that and this shirt was just nice size for that.
Front part of the shirt became front part of the bag and the back part the same way, shoulder strap was made out of the sleeves, the buttons were used and I also used one of the cuffs for inner pocket. This shirt has rather long cuffs, just good for a pocket.
Of course I had to take the shirt apart and I could just cut the seams, no need to rip anything. But of course shirt like this has darts and those can't be left unnoticed. The ones in front weren't on my way but the ones on back were so those had to be ripped open.
This upcycled bag follows pretty much the tutorial from http://www.handmadiya.com. I skipped the pocket part of the tutorial as I made the pocket with upcycled cuff. If you want to do it like I did, just sew your cuff on the lining. Cut the cuff in two, lower part being slightly bigger (you would want the button to be in this part), stitch the pocket part onto the lining. If you have thin lining I recommend using fusible interfacing behind the pocket (if you haven't attached the interfacing for the whole lining). Sew the cover of the pocket (the one with the whole) on to the lining right sides facing, turn the cover and stitch over it. This way you can make a pocket for important things like passport with very little effort.
The next step for me was to make a pocket outside the package using the buttons in front. After cutting the main fabric with buttons closed I cut the pattern in half following the lower edge of the button row, cut suitable part from lining and sew them together. Tip; use zipper pressing foot if you do this, not working with usual one!
After this it was just following the tutorial as linked above. The tutorial didn't include pattern but this one is easy enough to draw, just check that the length of the zip panel is exactly the same as the upper edge of the bag.
I used fusible interfacing for the main fabric and behind the inner pocket and of course that can't be upcycled. The fabric of the shirt is quite soft and thin and even with the interfacing it still doesn't look as neat as I would like it. However, with harder and thicker fabric it wouldn't even need interfacing to look nice.
The pictures taken inside are nothing compared to pictures taken outside, I think I will use the light outside as often as the weather allows it.
As always, feel free to pin my pictures in Pinterest - or follow me there! You can now follow me in Facebook too so remember to check that too!


Tosi tyylikäs laukku! Nappilista on hieno yksityiskohta :)
ReplyDeleteKiitos. :)
DeleteJoo kiva että napitkin on uudessa käytössä. Näyttää hauskalta.
ReplyDeleteMitä sitä hyvää nappilistaa hukkaan heittämään kun oli melkein valmis tasku. :D Kiitos!
DeleteHyvä idea tuo laukku!
ReplyDeleteKiitos. :)
DeleteWhat a clever idea to use the button placket as an outside pocket!!!
ReplyDeleteThanks! I'm quite surprised myself too. :D I was just looking at the shirt thinking how to cut the parts, tried to work my way around the buttons and then I realized that I don't have to work around them, just use them!
DeleteThanks for the post, your blog contain a very nice and different information about the bag from the shirt that's are very nice. That's a different idea and it is fashionable good looks and make them look perfect.
ReplyDelete