Showing posts with label for kids. Show all posts
Thursday, 3 November 2016
Whale plushie out of upcycled denim
I like challenges. If someone gives an impossible sort of task and asks "you probably don't have any idea how to solve this?", I usually reply that let's see, I might figure something out. Usually I do. That's part of the reason why I like upcycling old clothes, there is always the challenge how you can make your plans work when you aren't working with virgin fabric that you have bought just the amount needed from fabric store.
But, before I start rambling about that again, let's get to the point... There are five bloggers who have started a 12 days of Christmas DIY challenges. The challenge also includes link up party. I didn't have any sewing time yesterday which is shame as the topic was to make Christmas decoration out of old clothes. So many ideas! I will make them anyway later though.
The point of the challenge is that the Christmas shouldn't cost the earth, I fully agree and I try to participate as much as I can.
Today's challenge was by Vicky; Take an old pair of jeans and turn them into a Christmas Gift.
Here we get to the challenge. I'm not a friend of denim/jeans when it comes to upcycling (even though they are the only pants I usually wear...) and this challenge wasn't as easy as yesterday's would have been. First I thought I would make some oven gloves as I had planned already earlier but the problem is that I didn't have jeans that were 100% cotton. The ones I was going to use had only 77% cotton! Not very safe to handle hot things with oven mittens that are in the danger of melting, if only partly. Had to think something else.
Then I remembered a whale that used to jump on the front page of my Pinterest some months back whenever I opened it. I didn't save it back then, it was made out of denim and thus not something I would probably make. Oh well, you can be wrong sometime.
We have had self filled advent calendars for the kids as long as they have known how to open them. Last year I switched it from calendar with 24 small pockets to a bigger bag that could hold some better surprises than just small figures, candies and some small scrap. Bigger bag doesn't mean more expensive surprises though, it's quite the opposite. For example you can print out new colouring picture, roll it and put in a bag. Cheap and very much appreciated by the kids!
So, how about start making the surprises already when there is almost full month before we can start opening the calenders? I looked up the whale, found tutorial, even though not a pattern and made these:
Not the prettiest things when it comes to sewing but I don't think my kids will mind... These are much smaller than the original (here) and I only draw the patterns from the screen from the pieces she had cut. If I made more, I would fix my "patterns" quite a deal, the fins are oddly proportioned and I don't think whales have snouts... It's not a fault of the original model, the original looks great! It is also much bigger. These are about 15cm long.
The snout... is it a whale? Flying fish? Bird? Mix-breed of bird, whale and dog? No idea, but I know my kids and they are usually crazy about new plushies and they will probably think it as some new specie - or then it is just a whale. I used beads as eyes and the fins and the tails I stitched with the kids' favourite colours; pink and green so you can tell them apart.
Thank you for the challenge for the hosts:
Jill @ Creating my way to Success
Vicky @ Vicky Myers Creations
Anna @ Tea and a Sewing Machine
Pam @ Threading My Way
Anne @ Domesblissity
Sunday, 25 September 2016
Baby gifts
Finally for a reason why in the last post I said that I have had only something small here in the blog. At least those feel small to me; the belt didn't take that long, the curtain was needed and fun but nothing special in it, the top for my daughter was just basic sewing etc. No tutorials, no interesting upcycles... That's how it feels to me, I have set some standards for myself and all of these are below those standards. Maybe not the belt, that was actually quite cool to understand you can make one yourself!
Our kids got a new cousin in August and now that they are a bit older and I actually have some sewing time I almost lost my head when thinking about what to make as a baby gift! What I ended up is less than half of what I was thinking of!
I mean, there are so many things you can sew for a baby and all of them are just way too cute to miss. And then all those little clothes! You don't need to think if the baby wants to wear them as you have to when the kids have an opinion of themselves. Just know something about how the mum feels about baby clothing (yeah, usually it is still a mum who decides about this...) and you are good to go.
As a new baby present I ended up doing this:
Car seat bag for an autumn baby so she can travel comfortably in a car during the cold weather. My daughter's Baby Born-doll is showing how it works; put a baby inside, close the seat belts, zip the bag. During the winter the babies need warm clothes and that means also thick clothes, especially when you compare to the size of the baby. It's more comfortable when you can close the seat belts over less clothing than over thick ones.
Also you can open this easily in the car when it is warm enough as well as for example in the grocery store. You don't want to wake up sleeping baby, at least if you have some grocery shopping to be done. So, just take your baby in her car seat, open the car seat bag and she can continue her sleeping undisturbed.
I didn't know what kind of car seat the family had and obviously couldn't ask so I made it fit to any car seat. Just asked some measurements from other parents and made it easy to use even with 5-point seat belts. It needed some thinking over but I'm quite happy with the result. There will be full car seat bag tutorial later on.
Good thing with the bag is that you can use it just like any other sleeping bag in a pram with belts too, it should work with those as well. I hope the family finds lots of use for this one.
The little girl got a name yesterday and was baptized, also an occasion to bring gifts. Naturally, self made through and through from us.
Worry eater of course, small baby boots, self made card and because they were hard to wrap self made present bag too. For the boots I made pattern myself out of the ones our daughter got as a baby. Also tutorial for those coming up and I try to make printable pattern too but we will see.
These were fun to make and even though they aren't really upcycles (except the worry eater of course), I will share the tutorials here too. I wish I had known how easy it is to make cool baby accessories myself when our kids were babies.
The new families often have tight budget, new baby needs so many things and here are couple things you can make yourself and with very low budget if you want to. Just upcycle some fabrics you already have and you have something that costs tens of euros in the shops! I will share some tips for doing this when making the tutorials.
Our kids got a new cousin in August and now that they are a bit older and I actually have some sewing time I almost lost my head when thinking about what to make as a baby gift! What I ended up is less than half of what I was thinking of!
I mean, there are so many things you can sew for a baby and all of them are just way too cute to miss. And then all those little clothes! You don't need to think if the baby wants to wear them as you have to when the kids have an opinion of themselves. Just know something about how the mum feels about baby clothing (yeah, usually it is still a mum who decides about this...) and you are good to go.
As a new baby present I ended up doing this:
Car seat bag for an autumn baby so she can travel comfortably in a car during the cold weather. My daughter's Baby Born-doll is showing how it works; put a baby inside, close the seat belts, zip the bag. During the winter the babies need warm clothes and that means also thick clothes, especially when you compare to the size of the baby. It's more comfortable when you can close the seat belts over less clothing than over thick ones.
Also you can open this easily in the car when it is warm enough as well as for example in the grocery store. You don't want to wake up sleeping baby, at least if you have some grocery shopping to be done. So, just take your baby in her car seat, open the car seat bag and she can continue her sleeping undisturbed.
I didn't know what kind of car seat the family had and obviously couldn't ask so I made it fit to any car seat. Just asked some measurements from other parents and made it easy to use even with 5-point seat belts. It needed some thinking over but I'm quite happy with the result. There will be full car seat bag tutorial later on.
Good thing with the bag is that you can use it just like any other sleeping bag in a pram with belts too, it should work with those as well. I hope the family finds lots of use for this one.
The little girl got a name yesterday and was baptized, also an occasion to bring gifts. Naturally, self made through and through from us.
Worry eater of course, small baby boots, self made card and because they were hard to wrap self made present bag too. For the boots I made pattern myself out of the ones our daughter got as a baby. Also tutorial for those coming up and I try to make printable pattern too but we will see.
These were fun to make and even though they aren't really upcycles (except the worry eater of course), I will share the tutorials here too. I wish I had known how easy it is to make cool baby accessories myself when our kids were babies.
The new families often have tight budget, new baby needs so many things and here are couple things you can make yourself and with very low budget if you want to. Just upcycle some fabrics you already have and you have something that costs tens of euros in the shops! I will share some tips for doing this when making the tutorials.
Tunnisteet:
baby accessories,
for kids,
frugal,
money saving,
worry eater
Thursday, 18 August 2016
Travelling with kids part 3 - travel tray
Final part of travelling with kids is travel tray. Super useful during long car trips when the kids can play with their small toys on their laps without them getting lost all the time. It keeps them entertained and happy for a long time, especially together with the toy bag and dry erase book.
First, the idea of travel tray isn't mine and for the pillow I used the tutorial by Two Sisters Crafting. Their tray is bigger and I have to admit it is much more neat than mine! They used new cookie tray that was painted nicely. Apparently from somewhere you can buy cookie sheets for 1$ per piece. Not here though. They would be perfect for crafting purposes for the kids but I highly suspect that you won't get an for a price like that here!
As my last post wasn't anything upcycled but a tutorial about getting best result with twin needle and the one previous that new clothes for my kids, I promised the next post would be something upcycled. This one is through and through. Here is what I used:
One plastic tray that was cut half. Plastic is near impossible to cut by hand and I was wondering how to cut it when my brother happened to visit. He said that our dad has that kind of saw that can cut it nice and neatly. Too bad he tried some other saw first and the plastic broke a bit. It was quite neat though after finished with the correct saw but the halves had some sharp points and I used duct tape to fix that (only thing here that isn't upcycled). Not pretty but it gets the job done and stays on. Why cut it half then? I was asked that and my answer was that it is too big. That's true! I asked for ideas how to cut a tray and I'm asked why I want to cut it? Don't you usually want to cut something that is too big to make it smaller? Yes, the tray was too big to fit on the kids' laps with the toy bags resting on the car tables in front of them. I think it would have been too big even without the car tables so it was better this way. And before you ask, the car tables are fixed on the front seat, they can't really be used for playing or drawing as they are too far away for that and if they were close enough, the kids' feet wouldn't fit.
I got this fabric from a relative of mine with words "do you have any use for this?". I didn't at the time but of course I took it. Since then I have used it to make pockets for advent calendars and couple wizard hats:
The material is felt like and it is from a couch. Can you get anything more upcycled than some fabric that is from old couch when the couch was ripped and thrown away? I don't know what it was used for but it has been very useful after that. Only proves that you should always check and re-check what you are throwing away. It is rather big piece and it didn't cost a single cent, hard to find better deal.
But.. the problem with unknown fabrics is that you don't know what material is it. So, when you try to attach something with bondaweb by ironing it, this might happen:
As usual, I was in a hurry to get these ready so I was pretty annoyed when that happened. Of course, I should have realized to check, so it was just my own fault.
Different fabric scraps and patterns for cutting them.
These formed the bottom pillow. There is no need for the tutorial about that, just look at the Two Sisters Crafting link above. Couple changes though. First, I used oat to fill the pillow, second I added some padding so the oat won't poke through. Oat is from old warm/cold pillows that weren't needed anymore and the outer fabric is from crib padding that I ripped here. Like I said, upcycled through and through.
I cut two rectangulars just like Two Sisters Crafting advised to, the outer fabric bigger than the inner fabric and padding same size as the outer fabric. When you use padding like this, it is good idea to cut out the corners, the padding isn't needed there and it will just make the seam too thick.
Everything went well until I attached the pillow to the tray. I only had one type of glue that I could even think would work and that didn't. The glue stuck to the fabric but not to the plastic. There wasn't anything that would have been more suitable in our household and the shops aren't exactly around the corner so I had to use what I already had. Have you noticed that you really have to get creative when you can't just go to the shop and buy what you want? I think it is actually an advantage not to live next to all shops, I have to find new solutions quite often.
The new solution was this:
Small drill-made holes and yarn worked. It is just a yarn that goes through the holes and below is attached to the pillow with small hand-made stitches:
It was impossible to get the yarn tight but it doesn't matter really, it stays put when used on lap and stays on when carried.
Our kids like to play with small figures and they usually don't need much to trigger their imagination. A pillow or blanket can be mountain, stripes in the carpet a river and so on. They usually invent their own plays also in the car but I wanted to help a bit by making a small play mat for the tray. The pictures are appliqued, the cave was their favourite:
It has been used a lot, fits nicely on their laps and can be played on and they can also use it for drawing in the car. It is one of the best things you can have in a car! Overall I'm happy with it but it needs one improvement; the play mat doesn't stay on. Of course it doesn't, I don't understand how I didn't see it before. The felt-like fabric is quite stiff but there is no preventing that the plastic is slippery. For the next play mat I will sew some velcro on it and self adhesive velcro on the tray. I think we will be using these a lot in the future and they will never get bored as I can make more different play mats!
First, the idea of travel tray isn't mine and for the pillow I used the tutorial by Two Sisters Crafting. Their tray is bigger and I have to admit it is much more neat than mine! They used new cookie tray that was painted nicely. Apparently from somewhere you can buy cookie sheets for 1$ per piece. Not here though. They would be perfect for crafting purposes for the kids but I highly suspect that you won't get an for a price like that here!
As my last post wasn't anything upcycled but a tutorial about getting best result with twin needle and the one previous that new clothes for my kids, I promised the next post would be something upcycled. This one is through and through. Here is what I used:
One plastic tray that was cut half. Plastic is near impossible to cut by hand and I was wondering how to cut it when my brother happened to visit. He said that our dad has that kind of saw that can cut it nice and neatly. Too bad he tried some other saw first and the plastic broke a bit. It was quite neat though after finished with the correct saw but the halves had some sharp points and I used duct tape to fix that (only thing here that isn't upcycled). Not pretty but it gets the job done and stays on. Why cut it half then? I was asked that and my answer was that it is too big. That's true! I asked for ideas how to cut a tray and I'm asked why I want to cut it? Don't you usually want to cut something that is too big to make it smaller? Yes, the tray was too big to fit on the kids' laps with the toy bags resting on the car tables in front of them. I think it would have been too big even without the car tables so it was better this way. And before you ask, the car tables are fixed on the front seat, they can't really be used for playing or drawing as they are too far away for that and if they were close enough, the kids' feet wouldn't fit.
I got this fabric from a relative of mine with words "do you have any use for this?". I didn't at the time but of course I took it. Since then I have used it to make pockets for advent calendars and couple wizard hats:
The material is felt like and it is from a couch. Can you get anything more upcycled than some fabric that is from old couch when the couch was ripped and thrown away? I don't know what it was used for but it has been very useful after that. Only proves that you should always check and re-check what you are throwing away. It is rather big piece and it didn't cost a single cent, hard to find better deal.
But.. the problem with unknown fabrics is that you don't know what material is it. So, when you try to attach something with bondaweb by ironing it, this might happen:
As usual, I was in a hurry to get these ready so I was pretty annoyed when that happened. Of course, I should have realized to check, so it was just my own fault.
Different fabric scraps and patterns for cutting them.
These formed the bottom pillow. There is no need for the tutorial about that, just look at the Two Sisters Crafting link above. Couple changes though. First, I used oat to fill the pillow, second I added some padding so the oat won't poke through. Oat is from old warm/cold pillows that weren't needed anymore and the outer fabric is from crib padding that I ripped here. Like I said, upcycled through and through.
I cut two rectangulars just like Two Sisters Crafting advised to, the outer fabric bigger than the inner fabric and padding same size as the outer fabric. When you use padding like this, it is good idea to cut out the corners, the padding isn't needed there and it will just make the seam too thick.
Everything went well until I attached the pillow to the tray. I only had one type of glue that I could even think would work and that didn't. The glue stuck to the fabric but not to the plastic. There wasn't anything that would have been more suitable in our household and the shops aren't exactly around the corner so I had to use what I already had. Have you noticed that you really have to get creative when you can't just go to the shop and buy what you want? I think it is actually an advantage not to live next to all shops, I have to find new solutions quite often.
The new solution was this:
Small drill-made holes and yarn worked. It is just a yarn that goes through the holes and below is attached to the pillow with small hand-made stitches:
It was impossible to get the yarn tight but it doesn't matter really, it stays put when used on lap and stays on when carried.
Our kids like to play with small figures and they usually don't need much to trigger their imagination. A pillow or blanket can be mountain, stripes in the carpet a river and so on. They usually invent their own plays also in the car but I wanted to help a bit by making a small play mat for the tray. The pictures are appliqued, the cave was their favourite:
It has been used a lot, fits nicely on their laps and can be played on and they can also use it for drawing in the car. It is one of the best things you can have in a car! Overall I'm happy with it but it needs one improvement; the play mat doesn't stay on. Of course it doesn't, I don't understand how I didn't see it before. The felt-like fabric is quite stiff but there is no preventing that the plastic is slippery. For the next play mat I will sew some velcro on it and self adhesive velcro on the tray. I think we will be using these a lot in the future and they will never get bored as I can make more different play mats!
Friday, 5 August 2016
New clothes for kids
Sometime ago I got this master idea to cut more clothes at the same time so I could just sew them all at one go. But... you won't cut that amount at one go. You won't even sew them at one go, at least not if you have kids and all the other duties in the house. It took actually weeks before they were finished and then with the summer trips couple more weeks to get the photos here to the blog. I first mentioned them here. But here they are, finally!
These are made out of new fabrics but due to my frugal nature I will never throw away a piece of fabric so I used scraps from my scrap fabric box and of course saved everything that was left from these. First couple things I'm proud of:
The top part is new fabric, second class but the mess that made it second class was easy to work around as it was on the bottom edge of the piece. The hem in this is upcycled from old t-shirt! So easy, no need to sew the hem line, just cut, gather to right size and sew together with top part.
Ah, Frozen. My favourite shirt because of the use of the fabric and my daughter's favourite shirt because Frozen:
I had quite big pieces in my scrap fabric box (big pieces for me are something that almost makes part of kids' shirt) that go nicely together and I happened to find interesting looking pattern from Ottobre-magazine where the shirt was already made out of small pieces. My pieces were so small though that I made also the back part from two pieces. We went to our summer cottage for a week and she refused to use nothing else than this shirt - when she wasn't wearing swimming suit.
I rarely buy new fabric, only if it is in good discount or if I really need something. But what I like to buy are the leftover parts from other sewers. Many sewers don't want to use their time to use all the scraps that are left over from other projects and I understand it, it takes time to cut them and especially it takes time to look for matching pieces. But lucky for me, many of them sale them in Facebook groups! I hope more people would do it, I suspect that many pieces like this go to the trash bin when their owners don't think that someone would have use for them. If you do that and are reading this, can you think about offering the scrap fabrics to someone instead of throwing them away? I usually pay something for them (plus the postage) but only when the price is descent, after all, they are just that, scraps, uneven pieces that you don't know for sure if you can finally use them for something or not. I use these scraps a lot and they offer constant source of inspiration. It is almost like upcycling trash! But don't they say that someone's trash is other one's treasure? So true.
Other dress with the same pattern as the first one (modified from a shirt pattern, hem and butterfly sleeves cut without any particular pattern):
For the hem I used a piece of fabric that was already right size in height. I have used usual zig zag to finish the hem and sleeves.
Leggings for my daughter, pattern from Ottobre-magazine with modifications to height and width. Also the original one had only fake pockets, I changed them to real ones because the fake pockets are annoying, they look like pockets but you can't fill them with stones or pine cones or other treasures like that. The real pockets would have worked better with separate waist band though but they will do as it is. The piece with pink pony is also from my scrap fabric box.
I also added knee patches right from the start and the back pockets I made with the same fabric.
Then to my son's clothes. He doesn't very much like Star Wars, Spiderman, Batman or monsters or anything like that. It seems that 4 year old boys should wear only those kind of clothes with the same colours as the adult men do, dark colours, grey and black that is. What if they scare him and he doesn't even know what those creatures are? I also don't think he needs to know just yet. He likes bright colours, cute animals and sometimes cars and tractors will do if they look nice. Try to find those from the shops, it is near impossible if you don't use tens of euros for one piece of clothing. And as I use rather tens of euros for a bag of clothing they are pretty much out of the question. At this moment it is actually cheaper to make clothes that he likes than try to buy them - if you compare to the small companies' expensive clothes. Don't get me wrong, I know exactly why pants or shirt cost 30-40e, they should if the workers get anywhere near descent salary but I just can't simply afford that. Not especially when the time that the clothes fit is so short. The fabric for all the following either with good discount, from other sewers (some kind of second hand fabric) or again from my scrap fabric box.
Cute, friendly tigers and I thought my son would wear it as soon as he sees it. How wrong can I be? He decided that the buttons were disgusting. These:
I have no idea why but he was pretty strict about it. Then one day few days afterwards I simply closed the buttons and offered the shirt and he approved because after all, the friendly cheetahs (yes, he decided they are cheetahs, snow cheetahs actually even though he well knows what tiger looks like...) are cute. Also great picture to show how I want to save also money and time - I used black thread for all three shirts and also to darker pants. Why change it all the time when it doesn't show anywhere? Also saves money when you don't have the threads in all rainbow colours without lessening the quality of the clothes. No one sees it so it harms no one.
One shirt with vehicles:
The vehicle fabric was just a bit too short so I added the sleeves and hem from other fabric. I would have liked to use something else but couldn't find anything that would at least somehow match with turquoise.
And his favourite:
It is colourful, it has cute, smiling animals and all his favourite colours (blue and green). For all the shirts I used one raglan sleeved pattern from one of the Ottobre's (can't remember which one) and just made some modifications for each shirt.
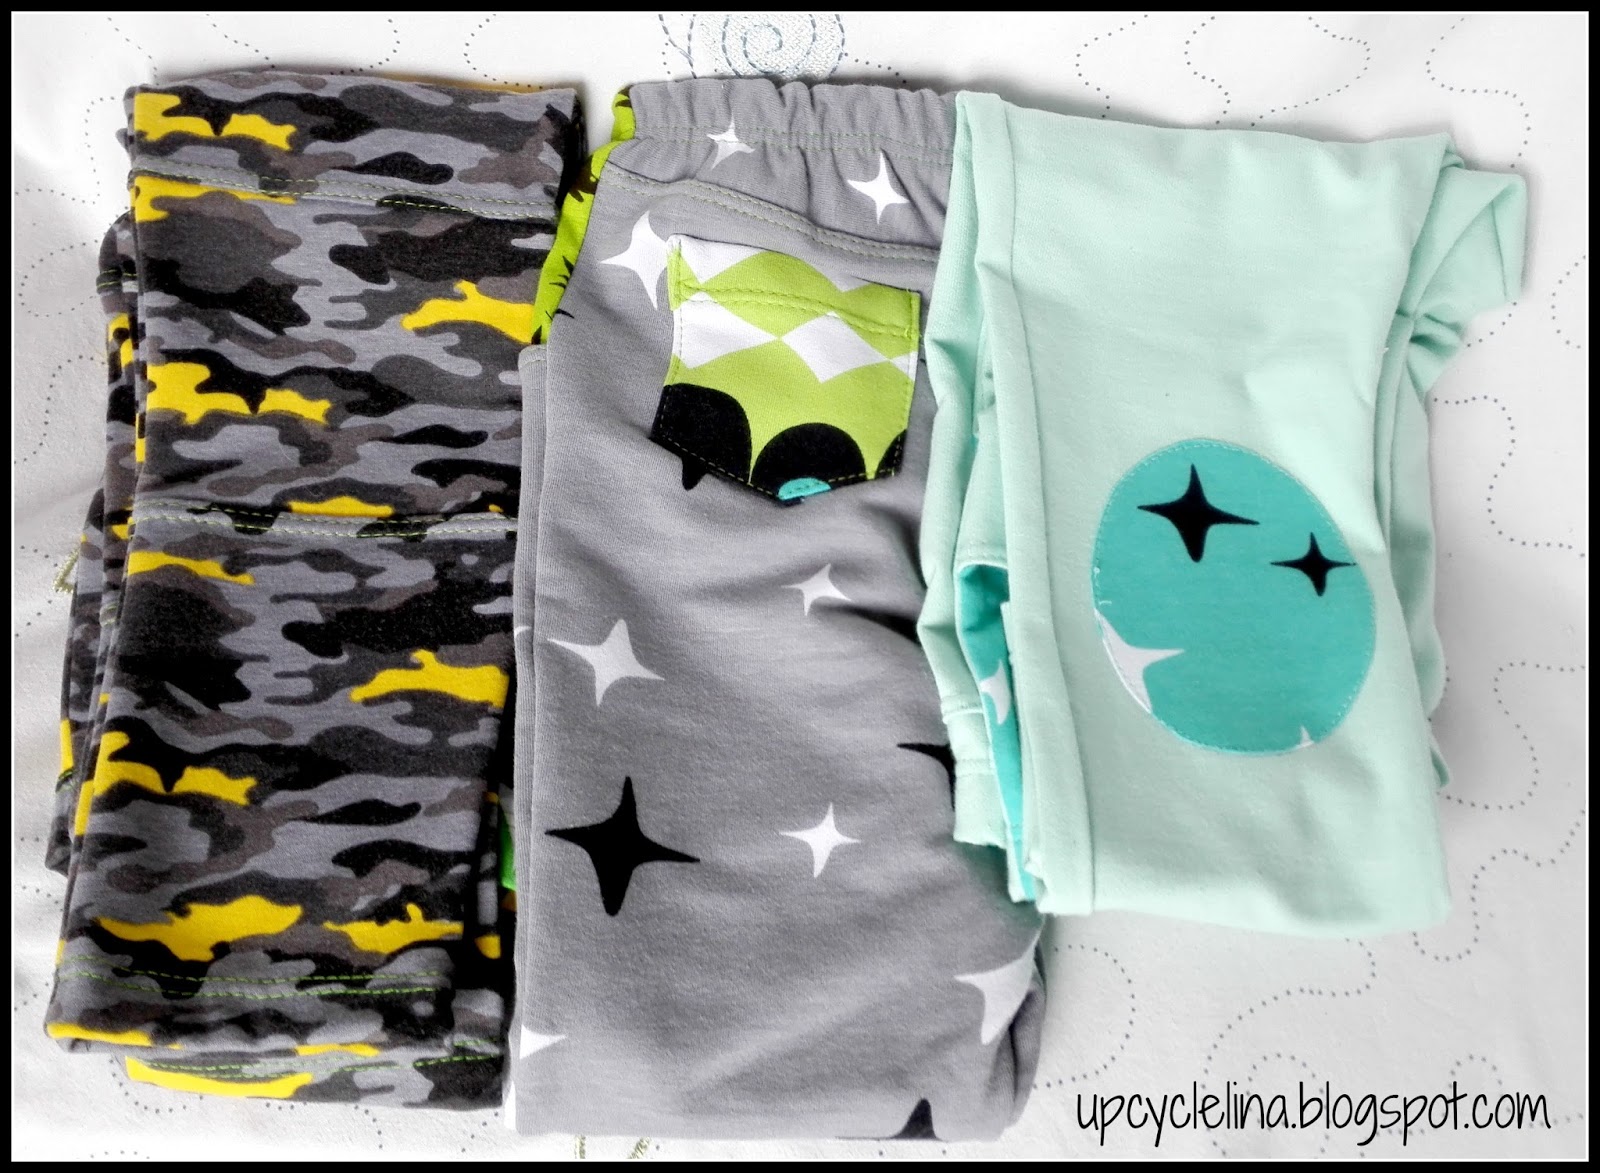
Some leggings for him too:
The two pairs on the right were approved right away, they both have something green in them but the ones on the left... I thought we might have a problem as the fabric definitely isn't the colour/style he likes but I found it cheap from local store and it seems to be quite nice quality and I thought they would do as playground pants. But no. I was told that he doesn't like them, he won't ever wear them and I was forbidden to put the pants to his closet. They say that the girls are picky with their clothes and boys let you wear them anything you like but that most certainly isn't true. I have a very picky 4 year old boy here.
That was quite some work! But I'm happy, I used many different fabrics and thus making my fabric piles at least tiny bit lower and also used many from my scrap fabric boxes, even upcycled a hem from one shirt. Of course they were fun to sew but the cutting - I don't miss that. And now kids have new clothes to wear for pre-school and kindergarten!
Next time, something upcycled! Meanwhile you can check my eight new worry eaters: http://upcyclelina.blogspot.fi/2016/07/more-upcycled-worry-eaters.html or read about our short summer trip: http://upcyclelina.blogspot.fi/2016/07/summer-time.html
These are made out of new fabrics but due to my frugal nature I will never throw away a piece of fabric so I used scraps from my scrap fabric box and of course saved everything that was left from these. First couple things I'm proud of:
The top part is new fabric, second class but the mess that made it second class was easy to work around as it was on the bottom edge of the piece. The hem in this is upcycled from old t-shirt! So easy, no need to sew the hem line, just cut, gather to right size and sew together with top part.
Ah, Frozen. My favourite shirt because of the use of the fabric and my daughter's favourite shirt because Frozen:
I had quite big pieces in my scrap fabric box (big pieces for me are something that almost makes part of kids' shirt) that go nicely together and I happened to find interesting looking pattern from Ottobre-magazine where the shirt was already made out of small pieces. My pieces were so small though that I made also the back part from two pieces. We went to our summer cottage for a week and she refused to use nothing else than this shirt - when she wasn't wearing swimming suit.
I rarely buy new fabric, only if it is in good discount or if I really need something. But what I like to buy are the leftover parts from other sewers. Many sewers don't want to use their time to use all the scraps that are left over from other projects and I understand it, it takes time to cut them and especially it takes time to look for matching pieces. But lucky for me, many of them sale them in Facebook groups! I hope more people would do it, I suspect that many pieces like this go to the trash bin when their owners don't think that someone would have use for them. If you do that and are reading this, can you think about offering the scrap fabrics to someone instead of throwing them away? I usually pay something for them (plus the postage) but only when the price is descent, after all, they are just that, scraps, uneven pieces that you don't know for sure if you can finally use them for something or not. I use these scraps a lot and they offer constant source of inspiration. It is almost like upcycling trash! But don't they say that someone's trash is other one's treasure? So true.
Other dress with the same pattern as the first one (modified from a shirt pattern, hem and butterfly sleeves cut without any particular pattern):
For the hem I used a piece of fabric that was already right size in height. I have used usual zig zag to finish the hem and sleeves.
Leggings for my daughter, pattern from Ottobre-magazine with modifications to height and width. Also the original one had only fake pockets, I changed them to real ones because the fake pockets are annoying, they look like pockets but you can't fill them with stones or pine cones or other treasures like that. The real pockets would have worked better with separate waist band though but they will do as it is. The piece with pink pony is also from my scrap fabric box.
I also added knee patches right from the start and the back pockets I made with the same fabric.
Then to my son's clothes. He doesn't very much like Star Wars, Spiderman, Batman or monsters or anything like that. It seems that 4 year old boys should wear only those kind of clothes with the same colours as the adult men do, dark colours, grey and black that is. What if they scare him and he doesn't even know what those creatures are? I also don't think he needs to know just yet. He likes bright colours, cute animals and sometimes cars and tractors will do if they look nice. Try to find those from the shops, it is near impossible if you don't use tens of euros for one piece of clothing. And as I use rather tens of euros for a bag of clothing they are pretty much out of the question. At this moment it is actually cheaper to make clothes that he likes than try to buy them - if you compare to the small companies' expensive clothes. Don't get me wrong, I know exactly why pants or shirt cost 30-40e, they should if the workers get anywhere near descent salary but I just can't simply afford that. Not especially when the time that the clothes fit is so short. The fabric for all the following either with good discount, from other sewers (some kind of second hand fabric) or again from my scrap fabric box.
Cute, friendly tigers and I thought my son would wear it as soon as he sees it. How wrong can I be? He decided that the buttons were disgusting. These:
I have no idea why but he was pretty strict about it. Then one day few days afterwards I simply closed the buttons and offered the shirt and he approved because after all, the friendly cheetahs (yes, he decided they are cheetahs, snow cheetahs actually even though he well knows what tiger looks like...) are cute. Also great picture to show how I want to save also money and time - I used black thread for all three shirts and also to darker pants. Why change it all the time when it doesn't show anywhere? Also saves money when you don't have the threads in all rainbow colours without lessening the quality of the clothes. No one sees it so it harms no one.
One shirt with vehicles:
The vehicle fabric was just a bit too short so I added the sleeves and hem from other fabric. I would have liked to use something else but couldn't find anything that would at least somehow match with turquoise.
And his favourite:
It is colourful, it has cute, smiling animals and all his favourite colours (blue and green). For all the shirts I used one raglan sleeved pattern from one of the Ottobre's (can't remember which one) and just made some modifications for each shirt.
Some leggings for him too:
The two pairs on the right were approved right away, they both have something green in them but the ones on the left... I thought we might have a problem as the fabric definitely isn't the colour/style he likes but I found it cheap from local store and it seems to be quite nice quality and I thought they would do as playground pants. But no. I was told that he doesn't like them, he won't ever wear them and I was forbidden to put the pants to his closet. They say that the girls are picky with their clothes and boys let you wear them anything you like but that most certainly isn't true. I have a very picky 4 year old boy here.
That was quite some work! But I'm happy, I used many different fabrics and thus making my fabric piles at least tiny bit lower and also used many from my scrap fabric boxes, even upcycled a hem from one shirt. Of course they were fun to sew but the cutting - I don't miss that. And now kids have new clothes to wear for pre-school and kindergarten!
Next time, something upcycled! Meanwhile you can check my eight new worry eaters: http://upcyclelina.blogspot.fi/2016/07/more-upcycled-worry-eaters.html or read about our short summer trip: http://upcyclelina.blogspot.fi/2016/07/summer-time.html
Tunnisteet:
for kids,
kids clothes,
upclycled scrap fabric
Saturday, 30 July 2016
More upcycled worry eaters!
After my last post about our summer time and short break because of summer trips finally something I have actually done! I have mentioned before how Finns tend to get crazy when it becomes summer and every town and village have their own summer events and fests. Our little village is no exception, our summer event lasted whole week with casual sport events, market etc. There were also small group of volunteers who opened a season shop for that week filled with local products. Potatoes and other farm products, crafts etc. I also made something, could have made more but the time was short with holiday trips and all other duties. I decided to make worry eaters and got together eight of them.
Four are the size I made the original one (here) and four are slightly smaller because the size of the clothes I upcycled for these. They are, of course, upcycled; zips, buttons and fabric comes from old clothes. For the filling I used new cotton wool. I didn't think it would be such a good idea to use old cotton wool from old pillows. Think about the sweat and grease the pillows might have absorbed! No washing can take it out of them, so new it was instead of upcycled.
I used knit fabrics to make them nicely soft and cuddly and of course saved the extra parts from the clothes I used.
This one was a small ballerina body and I cut the front part from the body's front part with the star, placing it on the side rather than in middle. Ears and eye background are from scrap fabric, the body itself is soft jersey.
My favourite worry eater! For this I used old adult pants made out of soft velour. There is still plenty of this fabric left for many other projects, the adult pants have so much fabric for upcycling purposes! Again, the rest is from my scrap box.
Green terry hoodie with bright pink zip and wristbands turned out to something more harmonic with green zip and yellow ears and eyes. Terry is elastic, very comfortable for a toy like this. Yellow fabric is out of old baby body.
Sometimes it is some small detail that makes you happy. In this case it is the zip. I had a sweatshirt blouse with grey sleeves (the fabric in ears) and I found a zip with matching colour from my storage! I like this one too because the fabric is sturdier than jersey and gives whole more feeling to a toy than jersey.
However, jersey works great for the smaller ones. For the the pink I used sleeveless summer top in size 104. From the shirts at this size you make easily the bigger one but then you need to have sleeves for the hands and ears. The blue one is t-shirt in size 104, also the missing long sleeves made it impossible to make the bigger one. Also the fabric is 100% viscose and very soft, I doubt it would have worked well with the big one.
For these I used old baby clothes, the left one is out of pants, the right one out of a body. Even the small baby clothes make great small worry eaters!
I have to say that if (or when) I will make more worry eaters for sale I will not make the fingers and toes! It would save me easily 15 min/worry eater - at least. I sold three of these in the season shop during that week, quite well when you think that these were the only things I had for sale, the shop was open only for a week and it was in a small village, not next to a busy shopping street in a city. Right after the week I sold two more so only three left!
I also made small notes with my email and blog addresses so someone interested could take a card and maybe contact me later.
I also had an explanation what these are, what they are made of and a mention that I can make something out of old favourite clothes, great keepsake! That's why I made these cards too, easy to grab into your wallet. The box is, of course, upcycled. I got a shower gel in a pretty box, this is the cover. It was quite pretty but the surface had suffered some damage in the bathroom so I covered the edges and the bottom:
It was just right for this use!
Altogether; 8 pieces of clothes used, same amount of zips and 16 buttons, not bad! If you took a look at my working room, you wouldn't notice it though, it is still too full!
And... if you want to make your own, I have a post about making your own worry eater with full tutorial: http://upcyclelina.blogspot.fi/2016/04/worry-eater-tutorial.html
Four are the size I made the original one (here) and four are slightly smaller because the size of the clothes I upcycled for these. They are, of course, upcycled; zips, buttons and fabric comes from old clothes. For the filling I used new cotton wool. I didn't think it would be such a good idea to use old cotton wool from old pillows. Think about the sweat and grease the pillows might have absorbed! No washing can take it out of them, so new it was instead of upcycled.
I used knit fabrics to make them nicely soft and cuddly and of course saved the extra parts from the clothes I used.
This one was a small ballerina body and I cut the front part from the body's front part with the star, placing it on the side rather than in middle. Ears and eye background are from scrap fabric, the body itself is soft jersey.
My favourite worry eater! For this I used old adult pants made out of soft velour. There is still plenty of this fabric left for many other projects, the adult pants have so much fabric for upcycling purposes! Again, the rest is from my scrap box.
Green terry hoodie with bright pink zip and wristbands turned out to something more harmonic with green zip and yellow ears and eyes. Terry is elastic, very comfortable for a toy like this. Yellow fabric is out of old baby body.
Sometimes it is some small detail that makes you happy. In this case it is the zip. I had a sweatshirt blouse with grey sleeves (the fabric in ears) and I found a zip with matching colour from my storage! I like this one too because the fabric is sturdier than jersey and gives whole more feeling to a toy than jersey.
However, jersey works great for the smaller ones. For the the pink I used sleeveless summer top in size 104. From the shirts at this size you make easily the bigger one but then you need to have sleeves for the hands and ears. The blue one is t-shirt in size 104, also the missing long sleeves made it impossible to make the bigger one. Also the fabric is 100% viscose and very soft, I doubt it would have worked well with the big one.
For these I used old baby clothes, the left one is out of pants, the right one out of a body. Even the small baby clothes make great small worry eaters!
I have to say that if (or when) I will make more worry eaters for sale I will not make the fingers and toes! It would save me easily 15 min/worry eater - at least. I sold three of these in the season shop during that week, quite well when you think that these were the only things I had for sale, the shop was open only for a week and it was in a small village, not next to a busy shopping street in a city. Right after the week I sold two more so only three left!
I also made small notes with my email and blog addresses so someone interested could take a card and maybe contact me later.
I also had an explanation what these are, what they are made of and a mention that I can make something out of old favourite clothes, great keepsake! That's why I made these cards too, easy to grab into your wallet. The box is, of course, upcycled. I got a shower gel in a pretty box, this is the cover. It was quite pretty but the surface had suffered some damage in the bathroom so I covered the edges and the bottom:
It was just right for this use!
Altogether; 8 pieces of clothes used, same amount of zips and 16 buttons, not bad! If you took a look at my working room, you wouldn't notice it though, it is still too full!
And... if you want to make your own, I have a post about making your own worry eater with full tutorial: http://upcyclelina.blogspot.fi/2016/04/worry-eater-tutorial.html
Tunnisteet:
for kids,
toys,
upcycled clothing,
worry eater
Monday, 4 July 2016
Diy dry erase book - travelling with kids part 2
Time for another thing that is handy when travelling with kids, dry erase book! There are some to be bought of course but the selection in here isn't that great and the idea of the few available is quite educational. Not that it only matters, the kids usually like those kind of things but the books I found were the kind where the kids need someone to read the tasks and explain them. Something that doesn't work very well for kids on the backseat of the car. Also, it would be great to use the activity books we already have and select the pages the kids like. Then things got a little bit out of hand and this turned out.
I tried to explain to everyone that making something like this is pretty normal thing to do before going for a car trip, nothing weird in it, right?
In case you are wondering the same thing... I did it because:
I knew the principles; use some plastic pockets and marker that can be erased easily. Plastic pockets I knew I could get anywhere, the ones used in folders would work just fine but the marker? There are no actual dry erase markers sold in Finland. The ones sold are made to be used with their own brand of books and might get messy working with other surfaces. Thank you for the great tips by a group of crafters in Facebook! Someone actually tried those dry erase markers on other surfaces so I knew if they would work or not! I found some on eBay (of course) but didn't have time to order them there. The tips included water soluble overhead projector and white board markers. I though white board markers would be too thick for this purpose so I decided on overhead projector markers. But... there are hardly any overhead projectors nowadays so there was nothing under that name. So, if you are looking for the markers I used, look for cd/dvd markers, they are the same, just under different name.
So I had the pens for my dry erase book but then I had another problem. The folder pockets were only A4's and I needed A5. A4 is way too big for the kids to use in the car. I could have cut them half but then the book would have been positioned wrong as the A5 activity pages I have are all vertical. I also wanted the book to open horizontally rather than vertically, again the problem with small space. It would have been frustrating for the kids to use something that they have to twist and turn to turn a page. A5 and vertical pages to make it open horizontally were the things I didn't want to compromise with. I'm sure there are the right size plastic pockets available in the depth of the internet but I still didn't have that time to wait for them. Yes, I could have cut the A4 pockets to A5's by simply making them smaller but simply couldn't bring myself up doing it. Imagine the amount of plastic that would go to waste just because of dry erase books for kids to be entertained during car trip?
Then I needed the covers and I didn't have any suitable ready folders either and first I thought I would use cardboard for them. But while looking for cardboard I I found couple old kids books that were just right! And what a great idea to upcycle old books that weren't used anymore.
I torn out the pages (and left for future crafting) and added ribbons to tie the pages. I found a necklace that I don't use, never have and most likely never will, that had just perfect ribbon! It is narrow enough and sturdy enough, the ribbon is some kind of fake leather.
The other parts I kept, of course for other upcycle projects. The ribbons I glued with hot glue.
Then I had to cover the activities with plastic. I found some overhead projector sheets that I have had way over 10 years. I once bought a package of them to make stencils but only used couple back then and still had 18 left. It wouldn't be enough for two books though so I bought a roll of sticky plastic (the one used to cover school books) and used that for the rest. I don't very much like to cover paper with plastic as it isn't possible to recycle the paper anymore but I thought I would use sticky plastic to the pages that would be used again and again. The sheets would be used for the pages that would get boring after couple trips and would need to be changed.
Of course, folding overhead projector sheet half isn't that easy but luckily I had solution right on hand, Wonderclips! Just match the edges, add Wonderclips (or clothespins) and once you are sure it will stay, press.
The pages with sticky plastic I added piece of normal paper on the place where I was going to make the holes to make it last better. For the plastic sheets I used first eyelets but decided after couple pages that I don't need them and made just the holes with the hole making tool that came with the eyelets.
With the sheets I used brads to keep the paper inside still. I attached the brads right next to the paper to pin it on its place, worked very well. Loosening the brads will make it possible to change the activities easily.
I attached the brads on different places for every page so the book wouldn't become too thick. Still, using the brads for the whole book would have been impossible because of the thickness so it was actually good thing I didn't have more overhead projector sheets, using sticky plastic for some worked just fine. Don't tie the ribbons too tight, the pages won't turn if you do that.
I could have left it here, right? Leaving the covers like that when there are so many ideas out there to try? Not likely. When I saw quiet books first time my first thought was "oh wow, that must have taken ages to make!". The second time "they would be great to make but I will never have the time". The third time "they would be great to make". The fourth "my kids would love them" and small voice in my head only whispered "I will never have the time". The fifth (I have been seeing them a lot lately because once you look something in Pinterest twice you get to see it much more often) "what would I make if had time?" At this point I was saving couple pages, you know, just in case. The sixth thought "what if I had the time, what if I made time for it?" added with a loud sound in my head "don't go there!" I knew that once I started looking them with that thought in my head I would have lost the game and I would be making them some day. The seventh thought "what does it matter if it takes time, you like doing it, just one page?" and a whisper in my head "you could be doing something more sensible like sewing new clothes for the kids!".
The other voice in my head lost. Of course it did as I knew it would from the moment I saw the quiet books for the first time. Does this ever happen to you? I wanted to make something nice for the cover and while doing it, I could make it one more activity. The problem was that most quiet book pages are meant to be used together, most of them won't keep kids busy for more than a minute, at least at the age of 4 and 5. The kids around 1-2 usually like closing and opening a clip for a longer period of time, the older kids not so much. First I thought I would make a clock with turning hands, then I saw some mazes that I considered as the mazes are my kids' favourite activity pages. But then I found a page with little mouse with cheese and home from http://anna-anafe.blogspot.fi/2014/09/blog-post.html. I don't understand a word of the blog post itself but all I needed was the picture.
I tried to sew the mouse but didn't have felt, like she seemed to use so I made my mouse out of Fimo clay and hot glued the ribbon-tail.
I draw the face with black permanent marker.
It can go under the cheese, come out from the holes and go back to its home:
And I was right, the kids liked this idea very much! They like small figures, especially animals and usually figure out their own play around them and this one quiet book page entertained them alone for few kilometers. It also didn't take that long to make actually, of course figuring out where to find all the materials took more time than the making itself. But that's usually the case with my projects. The cover itself is from my old jeans and I matched the inside seam to the back of the book. Here I also attached the marker with elastic band.
The idea here is that the marker's cap will stay put under the elastic band so it wouldn't get lost in the car. I thought of adding a ribbon to the marker as well but then decided against it, it would just annoy the kids. Of course with smaller kids I would advice to tie the marker too. As the marker is water soluble I cut few fabric scraps, wet them and packed them in self-sealing plastic bag as erasers. Of course the fabric scraps I have are mainly from the fabrics I have used to make clothes for them so they were interesting itself and nicely colourful.
I sew folds to the cover so it stays put but can be removed when I want to change it so it isn
't glued. Overall, this dry erase book was great success for the kids and I could upcycle so many things here! Here is a list what you need:
I tried to explain to everyone that making something like this is pretty normal thing to do before going for a car trip, nothing weird in it, right?
In case you are wondering the same thing... I did it because:
- usual paper activity books can't be opened properly by kids without normal table, they won't stay open
- paper activity books don't have hard covers, something that would be needed especially when there is no table
- once a maze is done, it is done, no re-doing it even though the kids would like to solve them again
- markers aren't great to use in the car as there are always caps missing and chalks or wooden colours are too light if you can't press them enough, again you need table for this
- chalks or wooden colours can't be erased, something very important in the car as there are pumps and turns in the road making drawing more difficult
So I needed an activity book that is A5 (approximately), opens easily, has hard covers, activities can be done again and again, uses markers that don't lose their caps and can be erased easily. After a brainstorm and surfing in the Pinterest I thought I had everything covered. Of course, it should be something that I could make out of the materials I had on hand, great project for upcycling!
I knew the principles; use some plastic pockets and marker that can be erased easily. Plastic pockets I knew I could get anywhere, the ones used in folders would work just fine but the marker? There are no actual dry erase markers sold in Finland. The ones sold are made to be used with their own brand of books and might get messy working with other surfaces. Thank you for the great tips by a group of crafters in Facebook! Someone actually tried those dry erase markers on other surfaces so I knew if they would work or not! I found some on eBay (of course) but didn't have time to order them there. The tips included water soluble overhead projector and white board markers. I though white board markers would be too thick for this purpose so I decided on overhead projector markers. But... there are hardly any overhead projectors nowadays so there was nothing under that name. So, if you are looking for the markers I used, look for cd/dvd markers, they are the same, just under different name.
So I had the pens for my dry erase book but then I had another problem. The folder pockets were only A4's and I needed A5. A4 is way too big for the kids to use in the car. I could have cut them half but then the book would have been positioned wrong as the A5 activity pages I have are all vertical. I also wanted the book to open horizontally rather than vertically, again the problem with small space. It would have been frustrating for the kids to use something that they have to twist and turn to turn a page. A5 and vertical pages to make it open horizontally were the things I didn't want to compromise with. I'm sure there are the right size plastic pockets available in the depth of the internet but I still didn't have that time to wait for them. Yes, I could have cut the A4 pockets to A5's by simply making them smaller but simply couldn't bring myself up doing it. Imagine the amount of plastic that would go to waste just because of dry erase books for kids to be entertained during car trip?
Then I needed the covers and I didn't have any suitable ready folders either and first I thought I would use cardboard for them. But while looking for cardboard I I found couple old kids books that were just right! And what a great idea to upcycle old books that weren't used anymore.
I torn out the pages (and left for future crafting) and added ribbons to tie the pages. I found a necklace that I don't use, never have and most likely never will, that had just perfect ribbon! It is narrow enough and sturdy enough, the ribbon is some kind of fake leather.
The other parts I kept, of course for other upcycle projects. The ribbons I glued with hot glue.
Then I had to cover the activities with plastic. I found some overhead projector sheets that I have had way over 10 years. I once bought a package of them to make stencils but only used couple back then and still had 18 left. It wouldn't be enough for two books though so I bought a roll of sticky plastic (the one used to cover school books) and used that for the rest. I don't very much like to cover paper with plastic as it isn't possible to recycle the paper anymore but I thought I would use sticky plastic to the pages that would be used again and again. The sheets would be used for the pages that would get boring after couple trips and would need to be changed.
Of course, folding overhead projector sheet half isn't that easy but luckily I had solution right on hand, Wonderclips! Just match the edges, add Wonderclips (or clothespins) and once you are sure it will stay, press.
The pages with sticky plastic I added piece of normal paper on the place where I was going to make the holes to make it last better. For the plastic sheets I used first eyelets but decided after couple pages that I don't need them and made just the holes with the hole making tool that came with the eyelets.
With the sheets I used brads to keep the paper inside still. I attached the brads right next to the paper to pin it on its place, worked very well. Loosening the brads will make it possible to change the activities easily.
I attached the brads on different places for every page so the book wouldn't become too thick. Still, using the brads for the whole book would have been impossible because of the thickness so it was actually good thing I didn't have more overhead projector sheets, using sticky plastic for some worked just fine. Don't tie the ribbons too tight, the pages won't turn if you do that.
I could have left it here, right? Leaving the covers like that when there are so many ideas out there to try? Not likely. When I saw quiet books first time my first thought was "oh wow, that must have taken ages to make!". The second time "they would be great to make but I will never have the time". The third time "they would be great to make". The fourth "my kids would love them" and small voice in my head only whispered "I will never have the time". The fifth (I have been seeing them a lot lately because once you look something in Pinterest twice you get to see it much more often) "what would I make if had time?" At this point I was saving couple pages, you know, just in case. The sixth thought "what if I had the time, what if I made time for it?" added with a loud sound in my head "don't go there!" I knew that once I started looking them with that thought in my head I would have lost the game and I would be making them some day. The seventh thought "what does it matter if it takes time, you like doing it, just one page?" and a whisper in my head "you could be doing something more sensible like sewing new clothes for the kids!".
The other voice in my head lost. Of course it did as I knew it would from the moment I saw the quiet books for the first time. Does this ever happen to you? I wanted to make something nice for the cover and while doing it, I could make it one more activity. The problem was that most quiet book pages are meant to be used together, most of them won't keep kids busy for more than a minute, at least at the age of 4 and 5. The kids around 1-2 usually like closing and opening a clip for a longer period of time, the older kids not so much. First I thought I would make a clock with turning hands, then I saw some mazes that I considered as the mazes are my kids' favourite activity pages. But then I found a page with little mouse with cheese and home from http://anna-anafe.blogspot.fi/2014/09/blog-post.html. I don't understand a word of the blog post itself but all I needed was the picture.
I tried to sew the mouse but didn't have felt, like she seemed to use so I made my mouse out of Fimo clay and hot glued the ribbon-tail.
I draw the face with black permanent marker.
It can go under the cheese, come out from the holes and go back to its home:
As you can see, I have sewn around the holes, this is to prevent stretching. The nest's top has also framilon-elastic band to make it, well, elastic, and to keep the mouse inside when not played.
And I was right, the kids liked this idea very much! They like small figures, especially animals and usually figure out their own play around them and this one quiet book page entertained them alone for few kilometers. It also didn't take that long to make actually, of course figuring out where to find all the materials took more time than the making itself. But that's usually the case with my projects. The cover itself is from my old jeans and I matched the inside seam to the back of the book. Here I also attached the marker with elastic band.
The idea here is that the marker's cap will stay put under the elastic band so it wouldn't get lost in the car. I thought of adding a ribbon to the marker as well but then decided against it, it would just annoy the kids. Of course with smaller kids I would advice to tie the marker too. As the marker is water soluble I cut few fabric scraps, wet them and packed them in self-sealing plastic bag as erasers. Of course the fabric scraps I have are mainly from the fabrics I have used to make clothes for them so they were interesting itself and nicely colourful.
I sew folds to the cover so it stays put but can be removed when I want to change it so it isn
't glued. Overall, this dry erase book was great success for the kids and I could upcycle so many things here! Here is a list what you need:
- old book
- overhead projector sheets/plastic folds/sticky plastic
- activity books or print activity pages, there are loads available
- cd/dvd marker, water soluble!
- fabric scraps
- self-sealing plastic bag
- old jeans
- yellow felt
- elastic band (couple centimeters)
- ribbon for tail
- fabric scrap for the nest
- framilon-elastic band for the nest's top
- Fimo clay or similar
- hot glue gun
Very fun project to do, something that I liked to make and the kids liked to use! Proved again that I should never throw anything away! And what is more, the books did keep the kids occupied quite long. I'm happy.
Subscribe to:
Posts (Atom)